Skip to content
OVER 5,000+ ★★★★★ Reviews! Buy in Bulk & SAVE up to 50% OFF!
OVER 5,000+ ★★★★★ Reviews!
STEP BY STEP • EVERY PRODUCT

4WDetail™ Product Directions

Tap your product & the full directions open right here. Follow the steps & you can’t go wrong.

HOW TO: 4WDETAIL with Justin & Shauno

Salt Exterminator™ 4WD Wash Directions

View product →

Salt Exterminator™ 4WD Wash is an extremely versatile cleaning solution! It can used for removing Salt, Sand, Mud, Road Grime, Red Dirt, Bugs, Oil & Stubborn Stains. With each different kind of debris you're trying to tackle, its very important to please abide by the differing methods & dilutions ratios listed below. If your 4WD has been neglected & not cleaned in a long period, we'll walk you through how to get your 4WD to a base point where maintenance cleans afterwards will be a breeze!

IMPORTANT: DO NOT allow to dry on surface & DO NOT use in direct sunlight NOR on hot surface.
HOW TO REMOVE SALT & SAND
  1. Ensure your 4WD is parked in shade, not in direct sunlight & surface is cool to touch before applying Salt Exterminator.
  2. Using a 4WDetail Pressure or Garden Snow Foam Cannon, mix a 1:9 dilution ratio with water, into Cannon's Canister.
  3. Snow Foam Entirety of your 4WDs topside & underbody with Salt Exterminator, ensuring all salt & sand is covered & saturated with Salt Exterminator. If road grime is present, Microfibre Noodle Mitt agitation may be required.
  4. Let Salt Exterminator foam dwell on surface for 2-3 minutes. DO NOT allow Salt Exterminator to dry.
  5. Using pressure washer or garden hose cannon (with canister detached), thoroughly rinse Salt Exterminator + Debris off your topside & underbody, in slow overlapping motions at 30-40cm away from surface.
  6. To make your next clean more efficient, easier & give your 4WD that next layer of protection, we recommend to now apply either Salt Seal or Salt Seal PRO to your topside & Chassis Shield to your underbody.
  7. Dry your 4WD with the 4WDetail XL Microfibre Drying Towel from top to bottom. DO NOT air dry, as this will results in water marks.
HOW TO REMOVE MUD & RED DIRT
  1. Ensure your 4WD is parked in shade, not in direct sunlight & surface is cool to touch before applying Salt Exterminator.
  2. Using a 4WDetail Pressure Snow Foam Cannon, mix a 1:3 to 1:1 dilution ratio with water, into Cannon's Canister.
  3. Snow Foam Entirety of your 4WDs top side & underbody with Salt Exterminator, ensuring all mud and/ or red dirt is covered & saturated with Salt Exterminator. If road grime is present, Microfibre Noodle Mitt agitation may be required.
  4. Let Salt Exterminator foam dwell on surface for 2-3 minutes. DO NOT allow Salt Exterminator to dry.
  5. Using pressure washer, thoroughly pressure wash off Salt Exterminator + Debris, in slow overlapping motions at 40-50cm away from surface.
  6. To make your next clean more efficient, easier & give your 4WD that next layer of protection, we recommend to now apply either Salt Seal or Salt Seal PRO to your topside & Chassis Shield to your underbody.
  7. Dry your 4WD's topside with the 4WDetail XL Microfibre Drying Towel from top to bottom. DO NOT air dry, as this will results in water marks.
HOW TO REMOVE ROAD GRIME
  1. Ensure your 4WD is parked in shade, not in direct sunlight & surface is cool to touch before applying Salt Exterminator.
  2. Using a 4WDetail Pressure Snow Foam Cannon, mix a 1:9 - 1:5 dilution ratio with water, into Cannon's Canister.
  3. Snow Foam Entirety of your 4WDs top side with Salt Exterminator, ensuring all road grime & fallout is covered & saturated with Salt Exterminator.
  4. Let Salt Exterminator foam dwell on surface for 2-3 minutes. DO NOT allow Salt Exterminator to dry.
  5. Using pressure washer, thoroughly pressure wash off Salt Exterminator + Debris, in slow overlapping motions at 40-50cm away from surface.
  6. Now the large majority of imbedded debris has been lifted off your paint's surface, you can use a 4WDetail Microfibre Noodle Mitt, to remove the deeply imbedded debris (such as road grime).
  7. Re-foam your 4WD with a 1:9 parts dilution ratio, suds up & saturate your Microfibre Noodle Mitt before contacting paint.
  8. From top to bottom, in horizontal movements, wipe over your 4WD with the Microfibre Noodle Mitt. After cleaning each panel, rinse out your mitt and re-suds before contacting your 4WD.
  9. Now thoroughly rinse all Salt Exterminator foam from top to bottom off your 4WD, ensuring no residue is left behind.
  10. To make your next clean more efficient & vastly easier, we recommend to now apply either Salt Seal or Salt Seal PRO to your topside.
  11. Dry your 4WD with the 4WDetail XL Microfibre Drying Towel from top to bottom. DO NOT air dry, as this will results in water marks.
HOW TO USE ON PPF WRAPPED &/ OR CERAMIC COATED VEHICLE
  1. Ensure your 4WD is parked in shade, not in direct sunlight & surface is cool to touch before applying Salt Exterminator.
  2. Using a 4WDetail Pressure Snow Foam Cannon, mix a 1:10 parts dilution ratio with water, into Cannon's Canister.
  3. Snow Foam Entirety of your 4WDs top side with Salt Exterminator, ensuring all road grime & fallout is covered & saturated with Salt Exterminator.
  4. Let Salt Exterminator foam dwell on surface for 1-1.5 minutes. DO NOT allow Salt Exterminator to dry.
  5. Using pressure washer, thoroughly pressure wash off Salt Exterminator + Debris, in slow overlapping motions at 40-50cm away from surface. Do not pressure wash into PPF edges, as this may damage and/or lift edges of wrap.
  6. Now the large majority of imbedded debris has been lifted off your vehicles PPF, you can use a 4WDetail Microfibre Noodle Mitt, to remove the deeply imbedded debris (such as road grime).
  7. Re-foam your 4WD with a 1:10 parts dilution ratio, suds up & saturate your Microfibre Noodle Mitt before contacting paint. Alternatively, add 100mL of Salt Exterminator 4WD Wash to a bucket with 10L of water, 1:100 parts dilution ratio. Foam up solution in bucket with pressurised water, suds up & saturate your Microfibre Noodle Mitt before contacting paint.
  8. From top to bottom, in horizontal movements, wipe over your 4WD with the Microfibre Noodle Mitt. After cleaning each panel, rinse out your mitt and re-suds before contacting your 4WD.
  9. Now thoroughly rinse all Salt Exterminator foam from top to bottom off your 4WD, ensuring no residue is left behind.
  10. To make your next clean more efficient & vastly easier, we recommend to now apply either Salt Seal or Salt Seal PRO to your topside.
  11. Dry your 4WD with the 4WDetail XL Microfibre Drying Towel from top to bottom. DO NOT air dry, as this will results in water marks.
TOP SIDE: HOW TO GET YOUR 4WD TO A MAINTENANCE POINT (If 4WD hasn't been cleaned regularly)
  1. Ensure your 4WD is parked in shade, not in direct sunlight & surface is cool to touch before applying Salt Exterminator.
  2. Using a 4WDetail Pressure Snow Foam Cannon, mix a 1:5 dilution ratio with water, into Cannon's Canister.
  3. Snow Foam Entirety of your 4WDs top side with Salt Exterminator, ensuring all salt, sand, mud and road grime is covered & saturated with Salt Exterminator.
  4. Let Salt Exterminator foam dwell on surface for 2-3 minutes. DO NOT allow Salt Exterminator to dry.
  5. Using pressure washer, thoroughly pressure wash off Salt Exterminator + Debris, in slow overlapping motions at 40-50cm away from surface.
  6. Now the large majority of imbedded debris has been lifted off your paint's surface, you can use a 4WDetail Microfibre Noodle Mitt, to remove the deeply imbedded debris (such as road grime).
  7. Re-foam your 4WD with a 1:9 parts dilution ratio, suds up & saturate your Microfibre Noodle Mitt before contacting paint.
  8. From top to bottom, in horizontal movements, wipe over your 4WD with the Microfibre Noodle Mitt. After cleaning each panel, rinse out your mitt and re-suds before contacting your 4WD.
  9. Now thoroughly rinse all Salt Exterminator foam from top to bottom off your 4WD, ensuring no residue is left behind.
  10. To make your next clean more efficient & vastly easier, we recommend to now apply either Salt Seal or Salt Seal PRO to your topside.
  11. Dry your 4WD with the 4WDetail XL Microfibre Drying Towel from top to bottom. DO NOT air dry, as this will results in water marks.
UNDERBODY: HOW TO GET YOUR 4WD TO A MAINTENANCE POINT
  1. Ensure your 4WD is parked in shade, not in direct sunlight & surface is cool to touch before applying Salt Exterminator.
  2. Using a 4WDetail Pressure Snow Foam Cannon, mix a 1:1 dilution ratio with water or full strength, into Cannon's Canister, depending on severity.
  3. Snow Foam Entirety of your 4WDs underbody with Salt Exterminator, ensuring all salt, sand, mud, stains and road grime is covered & saturated with Salt Exterminator.
  4. Let Salt Exterminator foam dwell on surface for 2-3 minutes. DO NOT allow Salt Exterminator to dry.
  5. Using pressure washer, thoroughly pressure wash off Salt Exterminator + Debris, in slow overlapping motions at 20-30cm away from surface.
  6. Now the large majority of imbedded debris has been lifted off your underbody's surface, you can use a course bristled brush, to remove the deeply imbedded debris stains.
  7. Attach spray trigger Salt Exterminator, at full concentration, spray onto stubborn oil, red dirt & other stains.
  8. Let sit for 30 seconds & thorouhgly pressure wash off at 20-30cms. In most cases this will remove the very stubborn debris. But if not, respray onto affected area & saturate brush with Salt Exterminator by spraying onto brush, agitate area, then thorougly rinse off.
  9. Now you've done all the work to remove old stubborn debris and staining, once underbody is dry, we strongly recommend to now seal your chassis with either Chassis Shield or Chassis Shield PRO. Not only will this make cleaning your underbody vastly easier, but it will also protect your Chassis on your next adventure!
★★★★★4.84060 verified reviews
✦ WHAT REVIEWERS SAY

Reviewers consistently say mud, red dirt & grime lift off without scrubbing & washing takes half the time it used to. Plenty were sceptical from the ads, then came back for the 5L. A few remind you to keep it out of the sun & rinse before it dries, exactly as the directions say.

Summarised from verified Loox reviews of this product
★★★★★

Love this product. Gets all of the mud/dirt off first go.

Will M.
★★★★★

Works great! Has easily halved my cleaning time 👌

Ben L.
★★★★★

I love how shiny my car is after I use salt exterminator it's also great for bugs & I don't get the streaks that other products leave behind.

Helen G.
READ ALL REVIEWS ON THE PRODUCT PAGE →

Chassis Shield™ Directions

View product →
WARNING
WEAR APPROPRIATE PPE:
GLOVES, PROTECTIVE CLOTHING, EYE PROTECTION, FACE PROTECTION, NOSE & FACE MASK (AVOID INHALATION) - USE IN WELL VENTILATED AREA
IMPORTANT: USE BEFORE & AFTER 4WDING | ALLOW UP TO 24 HOURS FOR CHASSIS SHIELD™ TO BOND TO UNDERBODY SURFACES BEFORE DRIVING | TEST IN INCONSPICUOUS AREA FIRST. DO NOT APPLY TO ENGINE, EXHAUST NOR ANY BRAKING COMPONENTS. DO NOT APPLY TO ANY VEHICLE COMPONENTS THAT REACH HIGH TEMPERATURES. ONLY APPLY TO CHASSIS RAILS & AXLES. REMOVE ALL OVERSPRAY FROM THESE COMPONENTS BEFORE DRIVING.

NOTE: SAFE FOR 4WDS WITH OR WITHOUT UNDERBODY CHEMICAL RUST PROOFING OR AFTERMARKET LININGS.

TEST IN INCONSPICUOUS AREA FIRST.
DIRECTIONS

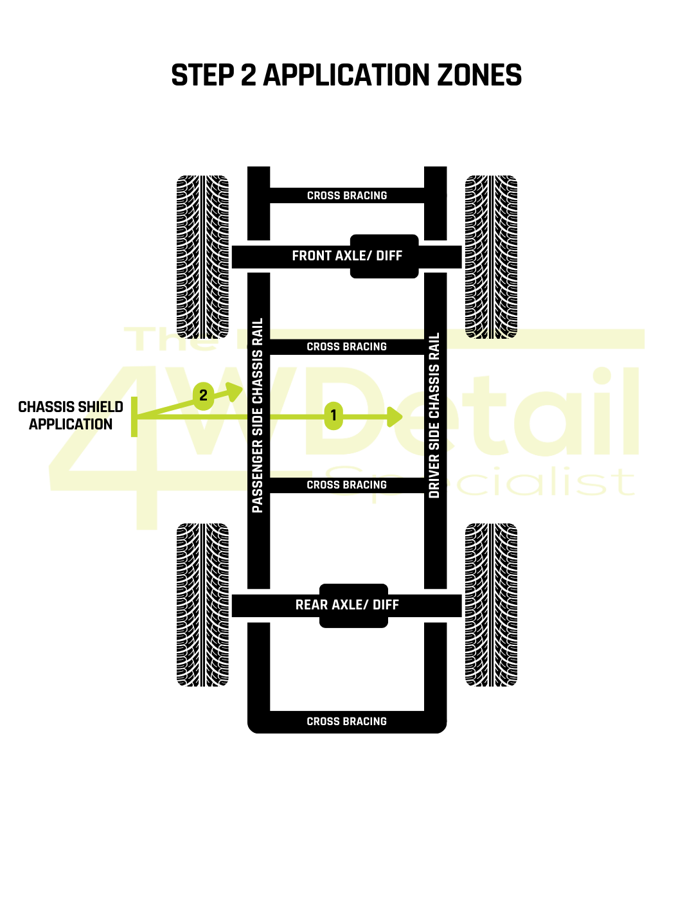
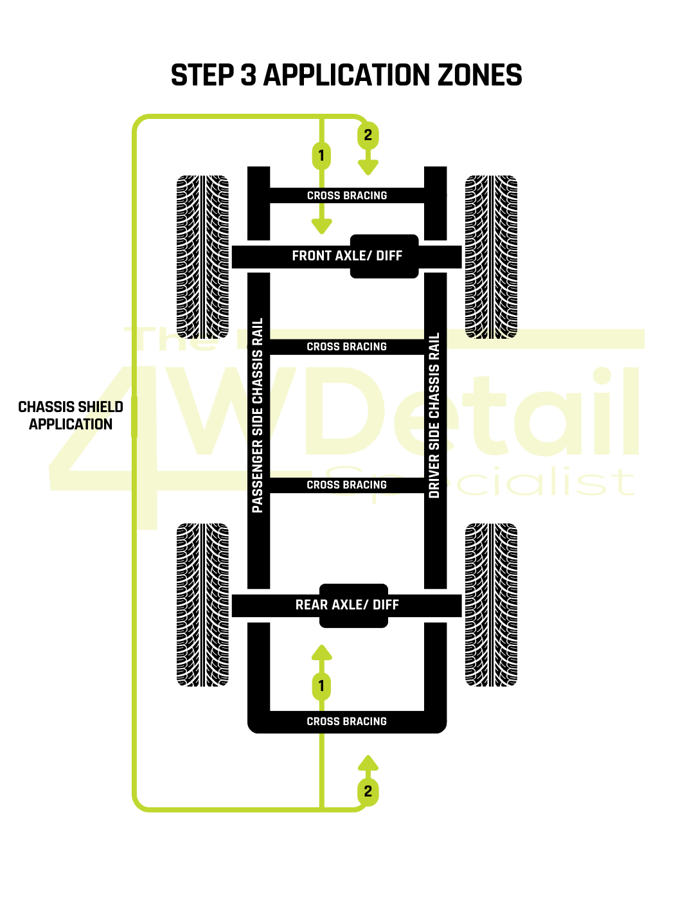
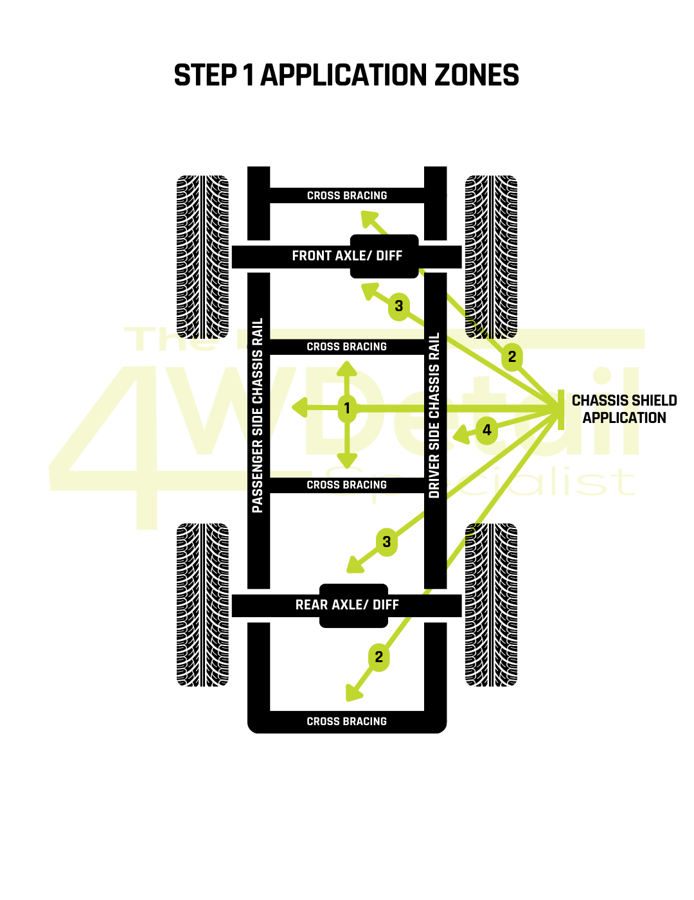
  1. Decontaminate your 4WD's underbody with Salt Exterminator™, for that seriously stubborn grime & stains. Ensure all sand &/or mud is removed. Allow underbody to then dry before Chassis Shield™ application.
  2. Spray directly onto surface using spray trigger. AVOID overspray onto topside exterior & wheels to limit visible clear residue on these components.
  3. Spray ONLY chassis & axles with Chassis Shield™ to ensure these rust prone surfaces are sealed against oxidising salts & acidic mud!
  4. Leave for a minimum of 24 hours before your next beach or muddy trail trip! DO NOT use or allow to dry in direct sunlight.
  5. To remove Chassis Shield™ overspray from unwanted areas (wheels, paint, mud flaps, etc.), spray Salt Exterminator™ (1:1 dilution) with spray trigger, agitate & then rinse off with a strong stream of water.
  6. Relax, knowing your pride & joy is sealed against corrosive salt & acidic mud for 2 weeks on the beach or trails!
★★★★★4.83560 verified reviews
✦ WHAT REVIEWERS SAY

Reviewers say sand & mud slide off the underbody at the next wash & their rails come up like new. The routine that keeps coming up is Salt Exterminator first, Chassis Shield once dry, then an easy rinse after the trip. One tip from reviews: overspray makes sealed concrete slippery, so lay something down first.

Summarised from verified Loox reviews of this product
★★★★★

Sprayed with Chassis Shield before our trip to Moreton. Worked great. It protected Lucy and all the sand came off easily after.

Jason H.
★★★★★

Absolutely love Chasis Shield. Apply it once every few months keeps my under body of the 300 super clean and fresh like brand new.

Jj T.
★★★★★

Love the chassis protection the car looks like it is straight from the show room.

Francesco P.
READ ALL REVIEWS ON THE PRODUCT PAGE →

Chassis Shield™ PRO Series Directions

View product →
WARNING
WEAR APPROPRIATE PPE:
GLOVES, PROTECTIVE CLOTHING, EYE PROTECTION, FACE PROTECTION, NOSE & FACE MASK (AVOID INHALATION) - USE IN WELL VENTILATED AREA
IMPORTANT: USE BEFORE 4WDING | ALLOW UP TO 24 HOURS FOR CHASSIS SHIELD™ PRO TO BOND TO UNDERBODY SURFACES BEFORE DRIVING | TEST IN INCONSPICUOUS AREA FIRST. DO NOT APPLY TO ENGINE, EXHAUST NOR ANY BRAKING COMPONENTS. DO NOT APPLY TO ANY VEHICLE COMPONENTS THAT REACH HIGH TEMPERATURES. ONLY APPLY TO CHASSIS RAILS & AXLES. REMOVE ALL OVERSPRAY FROM THESE COMPONENTS BEFORE DRIVING.

NOTE: FOR 4WDS WITH UNDERBODY CHEMICAL RUST PROOFING OR AFTERMARKET LININGS: TEST IN INCONSPICUOUS AREA FIRST - INCOMPATIBLE WITH NATURAL RUBBER & BUTYL RUBBER.

TEST IN INCONSPICUOUS AREA FIRST.

DIRECTIONS

  1. Decontaminate your 4WD's underbody with Salt Exterminator™, for that seriously stubborn grime & stains. Ensure all sand &/or mud is removed. Ensure there is no dirty, wet nor oily residue left on target application areas. Allow underbody to then dry before Chassis Shield™ PRO application.
  2. Spray directly onto surface using spray trigger. AVOID overspray onto topside exterior & wheels to limit visible clear residue on these components.
  3. Mask off all areas that you do not want to coat with Chassis Shield PRO. Spray chassis & axles ONLY with Chassis Shield™ PRO to ensure these rust prone surfaces are sealed against oxidising salts & acidic mud!CAUTION: Chassis Shield PRO will leave visible clear coat on ground. To avoid this, lay down old tarp, sheets or cardboard etc. to catch drips & overspray. Treat Chassis Shield PRO application precautions as you would applying paint.
  4. Leave for a minimum of 24 hours before your next beach or muddy trail trip! DO NOT use or allow to dry in direct sunlight. TOUCH DRY IN 4 HOURS.
  5. To remove Chassis Shield™ PRO overspray from unwanted areas (wheels, paint, mud flaps, etc.), apply TURPS with spray trigger or saturated cloth, agitate & then rinse off with a strong stream of water.
  6. Relax, knowing your pride & joy is sealed against corrosive salt & acidic mud for 3 months on the beach or trails!
★★★★★4.83560 verified reviews
✦ WHAT REVIEWERS SAY

Reviewers with rigs constantly in red clay & salt say the PRO coat keeps their chassis basically clean between trips, even in rain & long kms. Most follow the wash first, coat once dry routine & report it holding up track after track. Mask up & treat it like paint when applying, just as the warnings say.

Summarised from verified Loox reviews of this product
★★★★★

Drove in red clay and had sod-fulls on the side steps and chassis. Drove home in moderate rain and 150km later, chassis was basically clean.

Johannes W.
★★★★★

Best car wash products I have ever used. The underbody sealer for any vehicle that goes off road is a must. Makes it come up like brand new.

Jeff T.
★★★★★

I had hesitation if it would clean as good as advertised but so far so good. Keen to see how the chassis shield holds up after a few tracks.

Daniel F.
READ ALL REVIEWS ON THE PRODUCT PAGE →

Salt Seal™ Directions

View product →
IMPORTANT: USE BEFORE & AFTER 4WDING | SHAKE WELL BEFORE USE | USE WITHIN 1-3 DAYS OF SOILING 4WD THOROUGHLY DECONTAMINATE YOUR 4WDS TOPSIDE EXTERIOR WITH SALT EXTERMINATOR™ PRIOR TO USE FOR BEST SALT SEALING RESULTS!
DO NOT USE IN DIRECT SUNLIGHT. DO NOT ALLOW SALT SEAL™ TO DRY ON SURFACE. DO NOT LET SALT SEAL™ DWELL FOR LONGER THAN SPECIFIED TIME FRAME.

TEST IN INCONSPICUOUS AREA FIRST.

DIRECTIONS

  1. Add 50-80ml to 1L to snow foam cannon. Fill the remainder of cannon with water.
  2. For stronger dilutions it is not necessary to fill entire cannon with solution. Mixing to a 500ml total solution will allow you to get more washes per Salt Seal™ bottle.
  3. Spray entirety of top side exterior with Salt Seal™ to ensure all topside exterior surfaces are sealed against oxidising salts & acidic mud!
  4. Let Salt Seal™ dwell on your paint, glass, rubbers & plastics for 1-1.5 minutes, then rinse all coated areas with use of pressure washer, ensuring all excess Salt Seal™ has been removed. DO NOT use in direct sunlight. DO NOT allow Salt Seal™ to dry on surface.
  5. Dry off your 4WD with a quality microfibre drying towel to avoid watermarks.
  6. Relax, knowing your pride & joy is sealed against corrosive salt & acidic mud!
★★★★★4.83775 verified reviews
✦ WHAT REVIEWERS SAY

Reviewers say water beads off, the shine holds between washes & salt doesn't stick like it used to. Most run it straight after a Salt Exterminator wash, exactly as the directions recommend. The big tip in the reviews: don't let it dry on the surface, rinse it inside the dwell time.

Summarised from verified Loox reviews of this product
★★★★★

What a great product, very, very pleased with it.

Gary R.
★★★★★

Love the salt exterminator, I use it every time I get home from a 4wd.

Max L.
★★★★★

Absolutely amazing car wash, the dirt and grime just runs off!

Dave J.
READ ALL REVIEWS ON THE PRODUCT PAGE →

Grime Grinder™ Interior Cleaner Directions

View product →
IMPORTANT: DO NOT allow to dry on surface & DO NOT use in direct sunlight NOR on hot surface.

TEST IN INCONSPICUOUS AREA FIRST.

SPRAY & WIPE CLEANING METHOD

Spray Grime Grinder directly onto the area you wish to clean, let sit for 10-30 seconds then wipe with a microfibre cloth.

BRUSH AGITATION METHOD

If the affected area involves built up grime or dirt/ mud imbedded into plastics, spray Grime Grinder onto the affected area & let sit for 10-30 seconds. Whilst Grime Grinder is soaking the area, spray Grime Grinder into your detailing brush or microfibre towel until soaked. Now agitate the area. Soak brush to level that foaming occurs. Then wipe away residual foam & debris with a clean microfibre towel. Repeat these steps until affected area is clean.

UPHOLSTERY & CARPET

Soak soiled area with Grime Grinder, let sit for 1 minute, soak detailing brush or microfibre towel with Grime Grinder, then agitate soiled area. Repeat these steps until you are happy with results & then blot dry area with clean microfibre towel. If the stain/ soiling is too severe, continue using Grime Grinder as a wet vac extraction pre-treatment stain/ soil softener.

★★★★★4.81882 verified reviews
✦ WHAT REVIEWERS SAY

Reviewers say it's spray on, let it sit & wipe off, with dirt, dust & grime coming up a treat first go. For the built-up stuff, the brush agitation method in the directions is what gets it moving.

Summarised from verified Loox reviews of this product
★★★★★

So easy to use. To get rid of dirt grime and Dust. Simply spray on wash off. Comes up a treat.

Denis R.
★★★★★

Bring it up very nice happy with the product.

Mr R.
READ ALL REVIEWS ON THE PRODUCT PAGE →

Salt Exterminator™ Marine Series PWC & Boat Wash Directions

View product →
IMPORTANT: DO NOT allow to dry on surface & DO NOT use in direct sunlight NOR on hot surface.
HOW TO REMOVE SALT & SAND
  1. Ensure your Vessel and Trailer is parked in shade, not in direct sunlight & surface is cool to touch before applying Salt Exterminator Marine Series.
  2. Using a 4WDetail Pressure or Garden Snow Foam Cannon, mix a 1:9 dilution ratio with water, into Cannon's Canister.
  3. Snow Foam Entirety of your PWC, Boat and Trailer's topside & underbody with Salt Exterminator Marine Series, ensuring all salt & sand is covered & saturated with Salt Exterminator Marine Series. If road grime is present, Microfibre Noodle Mitt agitation may be required.
  4. Let Salt Exterminator foam dwell on surface for 1-3 minutes. DO NOT allow Salt Exterminator Marine Series to dry.
  5. Using pressure washer or garden hose cannon (with canister detached), thoroughly rinse Salt Exterminator Marine Series + Debris off your PWC, Boat and Trailer's topside & underbody, in slow overlapping motions at 30-40cm away from surface.
  6. To make your next clean more efficient, easier & give your PWC, Boat and Trailer that next layer of protection. We recommend to now apply either Salt Seal or Salt Seal PRO and Bead Boss to your PWC or Boat & Chassis Shield or Chassis Shield PRO to your Trailer.
  7. Dry your PWC, Boat and Trailer with the 4WDetail XL Microfibre Drying Towel from top to bottom. DO NOT air dry, as this will results in water marks.
HOW TO REMOVE MUD & RED DIRT
  1. Ensure your Vessel and Trailer is parked in shade, not in direct sunlight & surface is cool to touch before applying Salt Exterminator Marine Series.
  2. Using a 4WDetail Pressure Snow Foam Cannon, mix a 1:3 to 1:1 dilution ratio with water, into Cannon's Canister.
  3. Snow Foam Entirety of your PWC, Boat and Trailer's topside & underbody with Salt Exterminator Marine Series, ensuring all salt & sand is covered & saturated with Salt Exterminator Marine Series. If road grime is present, Microfibre Noodle Mitt agitation may be required.
  4. Let Salt Exterminator Marine Series foam dwell on surface for 2-3 minutes. DO NOT allow Salt Exterminator Marine Series to dry.
  5. Using pressure washer, thoroughly pressure wash off Salt Exterminator Marine Series + Debris, in slow overlapping motions at 40-50cm away from surface.
  6. To make your next clean more efficient, easier & give your PWC, Boat and Trailer that next layer of protection. We recommend to now apply either Salt Seal or Salt Seal PRO and Bead Boss to your PWC or Boat & Chassis Shield or Chassis Shield PRO to your Trailer.
  7. Dry your PWC, Boat and Trailer with the 4WDetail XL Microfibre Drying Towel from top to bottom. DO NOT air dry, as this will results in water marks.
HOW TO REMOVE ROAD GRIME
  1. Ensure your Vessel and Trailer is parked in shade, not in direct sunlight & surface is cool to touch before applying Salt Exterminator Marine Series.
  2. Using a 4WDetail Pressure Foam Cannon, mix a 1:9 dilution ratio with water, into Cannon's Canister.
  3. Snow Foam Entirety of your PWC, Boat and Trailer with Salt Exterminator Marine Series, ensuring all road grime & fallout is covered & saturated with Salt Exterminator Marine Series.
  4. Let Salt Exterminator Marine Series foam dwell on surface for 1-3 minutes. DO NOT allow Salt Exterminator Marine Series to dry.
  5. Using pressure washer, thoroughly pressure wash off Salt Exterminator Marine Series + Debris, in slow overlapping motions at 40-50cm away from surface.
  6. Now the large majority of imbedded debris has been lifted off your paint's surface, you can use a 4WDetail Microfibre Noodle Mitt, to remove the deeply imbedded debris (such as road grime).
  7. Re-foam your PWC, Boat and Trailer with a 1:9 parts dilution ratio, suds up & saturate your Microfibre Noodle Mitt before contacting paint.
  8. From top to bottom, in horizontal movements, wipe over your PWC or Boat with the Microfibre Noodle Mitt. After cleaning each panel, rinse out your mitt and re-suds before contacting your PWC or Boat.
  9. Now thoroughly rinse all Salt Exterminator Marine Series foam from top to bottom off your PWC or Boat, ensuring no residue is left behind.
  10. To make your next clean more efficient, easier & give your PWC, Boat and Trailer that next layer of protection. We recommend to now apply either Salt Seal or Salt Seal PRO and Bead Boss to your PWC or Boat & Chassis Shield or Chassis Shield PRO to your Trailer.
  11. Dry your PWC, Boat and Trailer with the 4WDetail XL Microfibre Drying Towel from top to bottom. DO NOT air dry, as this will results in water marks.
★★★★★4.81377 verified reviews
✦ WHAT REVIEWERS SAY

Boaties & jet ski owners say salt melts off the hull, trailer & motor & the shine comes back without polishing. Most do the 4WD, the boat & the trailer with the same bottle after each salty run.

Summarised from verified Loox reviews of this product
★★★★★

I use it on my boat and navara works a treat, makes them look smick 👍

Adam B.
★★★★★

Great product. I use this on my Jimny and my boat and it works a treat.

Lee S.
★★★★★

Great product guys! I use this on our 4x4's and also on the boat after each use.

Craig K.
READ ALL REVIEWS ON THE PRODUCT PAGE →

Salt Exterminator™ PWC & Outboard Engine Flush Directions

View product →
IMPORTANT: DO NOT allow to dry on surface & DO NOT use in direct sunlight NOR on hot surface. ALWAYS continue flushing engine until ALL solution has been rinsed.

TEST IN INCONSPICUOUS AREA FIRST. CONSULT YOUR MARINE MECHANIC IF UNSURE.

DIRECTIONS

  1. Fit flushing muffs to the engine water intakes. (Not applicable for most PWCs).
  2. Fill garden hose mixing unit with 50-100mL of Salt Exterminator PWC & Outboard Engine Flush.
  3. Attach garden hose mixing unit to water inlet of Outboard Engine Muffs or PWC then turn your tap on.
  4. Once there is enough water flow, start the engine and let it idle. Now flush your PWC or Outboard Engine as per usual/ motor manufacturer's directions.
  5. Continue flushing until all Salt Exterminator PWC & Outboard Engine Flush has stopped coming out and is just water.
  6. Rest easy knowing your PWC or Outboard's water intake system is salt free!
★★★★★4.82574 verified reviews
✦ WHAT REVIEWERS SAY

Marine Series owners say salt doesn't stand a chance, with the same gear coming out after every salty run for the boat, the jet ski & the trailer. The flush side takes care of what you can't see: the cooling passages inside your outboard or PWC that salt eats from the inside out. Run it until only clean water comes out, exactly as the directions say.

Summarised from verified Loox reviews of this product
★★★★★

Fantastic product, amazing results and highly recommend.

Matt D.
★★★★★

I've used a lot of cleaning equipment, and this one just works. Great products.

Matthew J.
READ ALL REVIEWS ON THE PRODUCT PAGE →

Wheel Wizard™ Wheel Cleaner Directions

View product →
IMPORTANT: DO NOT allow to dry on surface & DO NOT use in direct sunlight NOR on hot surface. AVOID overspray onto topside exterior, zinc coated and other uncoated metal surfaces.

TEST IN INCONSPICUOUS AREA FIRST.

DIRECTIONS

  1. Spray directly onto wheels using spray trigger. DO NOT DILUTE SOLUTION. AVOID overspray onto topside exterior, zinc coated and other uncoated metal surfaces.
  2. Let Wheel Wizard work its magic for 10 - 20 seconds maximum. CLEAN ONE WHEEL AT A TIME.
  3. Thoroughly rinse off Wheel Wizard with a pressure washer in slow overlapping motions with a pressure washer (20-30cm away from surface).
  4. If you have not cleaned your wheels in sometime, or have really bad built up brake dust and grime, repeat step 3. In addition, whilst Wheel Wizard is soaking the area, spray Wheel Wizard into your detailing brush. Now agitate the wheel. Soak brush to level that foaming occurs. Then thoroughly rinse your wheel with a pressure washer. Repeat these steps until all brake dust/ grime is gone.
  5. Ensuring all Wheel Wizard and brake dust has been rinsed away, dry your wheels with a quality microfibre towel to stop water marks from appearing.
  6. With a maintenance wheel clean now complete, future regular wheels cleans will be a breeze!
★★★★★4.81882 verified reviews
✦ WHAT REVIEWERS SAY

Reviewers say brake dust & road grime dissolve in seconds & wheels come up like new, one wheel at a time just like the directions say. A few even noticed less oxidation on their rotors. The tip that keeps coming up: rinse it off quick & don't let it dry.

Summarised from verified Loox reviews of this product
★★★★★

This product works super fast. It also reduced the oxidation on the rotors. Outcome surpassed my expectations.

Glenn M.
★★★★★

I sprayed everywhere possible under my car including the wheel arches, makes cleaning off sand and mud so much easier.

Mr C.
★★★★★

Works great just dissolves the road grime best car wash I used to date.

Darren B.
READ ALL REVIEWS ON THE PRODUCT PAGE →

Sand Assassin™ PRO Directions

View product →
SAND ASSASSIN SET UP
  1. Connect 4 jets to green boom.
  2. Set angle adjuster to 90 degrees (see FIG 1.). Pull the ribbed pin outwards to unlock the angle adjuster & you can now set your angle. Tip: we assembled these tight! For extra leverage changing angle, connect an extension boom to the angle adjuster.
  3. Screw adapter onto extension boom that has thread showing.
  4. Connect two extension booms to angle adjuster, then connect supplied adapter from lance to boom extensions.
  5. Before running pressurised water through Sand Assassin: with pressure washer off & connected, run water through Sand Assassin.
  6. With pressure washer primed, you're good to go!
SALT / CLASSIC MODE

Connect 4 white jets inline for mid-high pressure. You can also add Salt Exterminator to your pressure washer's soap reservoir (if it has one), following your pressure washer's guide. Salt Exterminator will not foam up, but does not need to in order to neutralise salt.

SAND / FLOOD MODE

Connect 2 black jets & 2 red plugs. Jets can be connected into any coupler. Perfect for high volume low pressure sand removal.

MUD MODE

Connect 2 turbo jet nozzles & 2 red plugs. Jets can be connected into any coupler.

100% MODULAR

As no two 4WDs are identical after modification, play around with all the different jets & configure them to what works best for your 4WD!

Sand Assassin PRO Warranty
Your Sand Assassin PRO is covered by a life-time warranty on specific parts, covering structural integrity and other key components, subject to the terms and conditions outlined below.1. Warranty Coverage:This life-time warranty covers the structural integrity of the green boom, axles, wheels, quick connectors attached to the green boom, lance extensions, and protection against thread damage. If these components are found defective or fail under normal use, we will repair or replace the unit at no charge.2. What is Covered:Structural integrity of the green boom. Axles, wheels, quick connectors on the green boom. Lance extensions and thread damage.3. What is Not Covered:3a. Physical Damage:Damage resulting from accidents, such as smashed wheels caused by being run over by a vehicle.3b. Cosmetic Imperfections:Wear and tear to powder coating. Wheel bearings, jets and turbo jets are not covered by the life-time warranty.3c. Environmental and Storage Damage:Prolonged exposure to extreme environmental conditions, such as leaving the unit in direct sunlight.3d. Improper Usage and Maintenance:Over-tightening of any threaded parts, leading to breakage. Failure to rinse and clean the Sand Assassin PRO after each use, leading to blockages or damage.3e. Unauthorised Modifications:Any modifications, alterations, or repairs performed by unauthorised persons void the warranty.3f. Parts Not Specified:Any parts not specifically mentioned in this warranty are not covered.4. Warranty Claim Process:To file a warranty claim, contact our customer support team with proof of purchase and a description of the issue. We may require the product to be returned for inspection.5. Additional Notes:This life-time warranty is non-transferable and applies only to the original purchaser. For any part not covered under this life-time warranty, we offer replacement parts at a heavily discounted rate. Shipping and handling fees for returns or repairs under warranty are the responsibility of the purchaser, unless otherwise stated by customer service.6. Proper Care Guidelines:To ensure the longevity of your Sand Assassin PRO: Clean the unit thoroughly with water after each use. Store the unit in a cool, dry place, away from direct sunlight and extreme temperatures. Avoid over-tightening threaded parts to prevent damage. By using this product, you agree to the terms and conditions outlined in this warranty.
★★★★★4.8277 verified reviews
✦ WHAT REVIEWERS SAY

Reviewers say it gets water into the spots you can't reach lying on the ground & underbody cleans stop being a soaked-through job. Sand & debris they didn't know was up there comes flooding out. Easy to use is the phrase that keeps coming up.

Summarised from verified Loox reviews of this product
★★★★★

Works great for cleaning under the ute. Very easy to use. Definitely recommend.

Zoe C.
★★★★★

After a wet day out in the bush, I was surprised at how much sand and debris was under the 4wd. The Sand Assassin Pro made it so easy to clean.

Brett W.
★★★★★

Wow, how good is this, after continually getting drenched and covered in mud, this just made the job so simple and it got into all the spots.

Steve C.
READ ALL REVIEWS ON THE PRODUCT PAGE →

Foam Thrower™ PRO Pressure Cannon Directions

View product →
ASSEMBLY
  1. First screw PT. 1 onto PT. 2.
  2. Slide the tube onto the nipple under PT. 1.
  3. Finally, screw PT. 2 onto the white reservoir tank.
SETUP
  1. Connect or screw your adapter PT. 3 onto PT. 1.
  2. Fill the reservoir tank with your desired Salt Exterminator or Salt Seal concentration.
SPRAY ANGLE
  1. Hold grey section PT. 4 & twist yellow section PT. 5 clockwise or anti-clockwise to narrow or widen your spray pattern.
FOAM LEVEL
  1. Twist grey dial PT. 6 clockwise or anti-clockwise to decrease or increase your foam level.
Foam Thrower PRO Pressure Snow Foam Cannon Warranty
Your Foam Thrower Pressure Snow Foam Cannon is covered by a 3-year limited warranty against defects in materials and workmanship, subject to the terms and conditions below.1. Warranty Coverage:This warranty covers the Foam Thrower Pressure Snow Foam Cannon for a period of 3 years from the date of purchase. During this period, if the product is found to be defective due to faulty materials or workmanship, we will repair or replace the unit at no charge.2. What is Covered:Defects in materials and workmanship. Malfunctions under advised use and care.3. What is Not Covered:3a - This warranty does not cover damage resulting from:Dropping the Foam Thrower Pressure Snow Foam Cannon or other physical impacts. Over tightening of any components or parts. DO NOT over tighten reservoir tank - this will result in snapping and cracking of plastic threads.3b - Improper Storage:Damage caused by prolonged exposure to direct sunlight or high temperatures. Damage due to incorrect storage, including storage for longer than 1 week without proper care.3c - Cosmetic Imperfections:Any superficial imperfections, such as scratches, dents, or dis-coloration, that does not affect the functionality of the product are not covered.3d - Chemical Damage - This warranty is void if the foam cannon is used with:Extreme acidic or alkaline solutions, including harsh degreasers. Chemicals not recommended for use with pressure washer attachments.3e - Improper Maintenance:Failure to properly rinse and clean the cannon with water after each use will void the warranty. Blockages or residue build-up due to lack of proper cleaning.3f - Unauthorised Modifications:Any alterations, modifications, or repairs done by unauthorized persons will void the warranty.3g - Improper Use:Damage caused by using the foam cannon in ways not intended or recommended, including using it with incompatible pressure washers, will not be covered.4 - Warranty Claim Process:To file a warranty claim, please contact our customer support team with your proof of purchase and a description of the issue. We may require the product to be returned for inspection.5 - Additional Notes:This warranty is non-transferable and applies only to the original purchaser. Shipping and handling fees for returns or repairs under warranty are the responsibility of the purchaser, unless otherwise stated by customer service. By using this product, you agree to the terms and conditions outlined in this warranty.6 - Proper Care Guidelines:To ensure the longevity of your Foam Thrower Pressure Snow Foam Cannon, always: Clean the unit with fresh water after each use. Store the cannon in a cool, dry place, away from direct sunlight and extreme temperatures. Avoid using aggressive chemicals not intended for foam cannons or pressure washers. If you follow these guidelines, your Foam Thrower Pressure Snow Foam Cannon will provide optimal performance for years to come!
★★★★★4.81656 verified reviews
✦ WHAT REVIEWERS SAY

Reviewers say the foam comes out thick, clings properly & the adapter kit has their pressure washer covered out of the box. Spray on, let it dwell, rinse off & the paint comes up clean without scrubbing.

Summarised from verified Loox reviews of this product
★★★★★

Foam cannon foamed up really good. Simple spray and rinse with the pressure washer. Easy to use and came out super clean.

Ryan G.
★★★★★

Even without scrubbing my car it comes up shiny as new, foam cannon works a treat thick foam exactly what I was after.

Caleb H.
★★★★★

Foam gun is so easy to use, comes with whatever adapter you need for your pressure washer. The nozzle adjusts easily.

Lucas B.
READ ALL REVIEWS ON THE PRODUCT PAGE →

Foam Thrower™ Garden Hose Cannon Directions

View product →
ASSEMBLY
  1. Push black lance PT. 1 into green mixer PT. 2, making sure the grooves are aligned. You'll hear a light click (it may not click). No twisting involved.
  2. Pull back the black connector on handle PT. 3 & slide it onto the male connector on PT. 2.
  3. Finally, screw PT. 2 onto the white reservoir tank.
SET UP
  1. Fill the reservoir tank with your desired Salt Exterminator or Salt Seal concentration.
  2. Connect your hose to PT. 4 & squeeze the trigger to shoot foam.
FOAM LEVEL
  1. Twist black dial PT. 5 clockwise or anti-clockwise to decrease or increase your foam level.
Foam Thrower Garden Cannon Warranty
Your Foam Thrower Garden Cannon is covered by a 3-year limited warranty against defects in materials and workmanship, subject to the terms and conditions below.1. Warranty Coverage:This warranty covers the Foam Thrower Garden Cannon for a period of 3 years from the date of purchase. During this period, if the product is found to be defective due to faulty materials or workmanship, we will repair or replace the unit at no charge.2. What is Covered:Defects in materials and workmanship. Malfunctions under advised use and care.3. What is Not Covered:3a - This warranty does not cover damage resulting from:Dropping the Foam Thrower Garden Cannon or other physical impacts. Over tightening of any components or parts. DO NOT over tighten reservoir tank - this will result in snapping and cracking of plastic threads.3b - Improper Storage:Damage caused by prolonged exposure to direct sunlight or high temperatures. Damage due to incorrect storage, including storage for longer than 1 week without proper care.3c - Cosmetic Imperfections:Any superficial imperfections, such as scratches, dents, or dis-coloration, that does not affect the functionality of the product are not covered.3d - Chemical Damage - This warranty is void if the foam cannon is used with:Extreme acidic or alkaline solutions, including harsh degreasers. Chemicals not recommended for use with pressure washer attachments.3e - Improper Maintenance:Failure to properly rinse and clean the cannon with water after each use will void the warranty. Blockages or residue build-up due to lack of proper cleaning.3f - Unauthorised Modifications:Any alterations, modifications, or repairs done by unauthorised persons will void the warranty.3g - Improper Use:Damage caused by using the foam cannon in ways not intended or recommended, including using it with incompatible pressure washers, will not be covered.4 - Warranty Claim Process:To file a warranty claim, please contact our customer support team with your proof of purchase and a description of the issue. We may require the product to be returned for inspection.5 - Additional Notes:This warranty is non-transferable and applies only to the original purchaser. Shipping and handling fees for returns or repairs under warranty are the responsibility of the purchaser, unless otherwise stated by customer service. By using this product, you agree to the terms and conditions outlined in this warranty.6 - Proper Care Guidelines:To ensure the longevity of your Foam Thrower Garden Cannon, always: Clean the unit with fresh water after each use. Store the cannon in a cool, dry place, away from direct sunlight and extreme temperatures. Avoid using aggressive chemicals not intended for foam cannons or pressure washers. If you follow these guidelines, your Foam Thrower Garden Cannon will provide optimal performance for years to come!
★★★★★4.6299 verified reviews
✦ WHAT REVIEWERS SAY

Reviewers without a pressure washer say it foams up properly straight off the garden tap & keeps the truck, canopy & boat clean without scrubbing. Beach regulars use it as their after-trip rinse-down.

Summarised from verified Loox reviews of this product
★★★★★

My car and fibreglass canopy are sparkalarkaling, I could never get the canopy clean, but no scrubbing needed it looks great! I'm hooked!

Paul F.
★★★★★

Keeps my car squeaky clean after visits to the beach.

Leona M.
★★★★★

Before n after on my sons 4x4 This stuff is amazing.

Wayne A.
READ ALL REVIEWS ON THE PRODUCT PAGE →

Garden Hose Chemical Mixing Unit Directions

View product →
IMPORTANT: DESIGNED FOR USE WITH SALT EXTERMINATOR 4WD WASH & MARINE SERIES OUTBOARD/ PWC ENGINE FLUSH.

DIRECTIONS

  1. Make sure the tap on your mixing unit is turned off before you start.
  2. Unscrew the canister & add 100ml of Salt Exterminator 4WD Wash. For outboards & PWCs, add 100ml of Marine Series Outboard/ PWC Engine Flush.
  3. Screw the canister back on & connect the mixing unit inline to your garden hose.
  4. Connect the mixing unit to whatever you're flushing with: your Chassis Flusher Wand, your Chassis ProTech fitting or your outboard's flush point.
  5. Set the mixture dispersion dial to suit the job. 5 levels of foaming power, start in the middle & dial it up if you want a stronger mix.
  6. Now turn the tap on your mixing unit on, so you don't spray foam before it's connected to what you're trying to flush.
  7. Flush until the water exiting runs clear (no foam).
  8. Once you're done, tip out any leftover solution & run clean water through the unit before storing it.
★★★★★4.81418 verified reviews
✦ WHAT REVIEWERS SAY

Reviewers like that it runs off the garden tap, no pressure washer needed, & the dial takes the mix stronger or weaker in a click. The one ask that pops up in reviews is clearer mixing ratios, which is exactly what these directions are for.

Summarised from verified Loox reviews of this product
★★★★★

I've got terrible water pressure so I can't use a pressure washer but the spray nozzle still works a treat.

Harley M.
★★★★★

Works great very happy with the results 👌

Kerry B.
READ ALL REVIEWS ON THE PRODUCT PAGE →

Chassis ProTech Directions

View product →

NOTE: Your Chassis ProTech kit includes everything needed for installation except a power drill: the brass fitting & aluminium bracket, high pressure nylon line with micro perforations, tube cutter, tek screws & tek bit.

WATCH: CHASSIS PROTECH INSTALLATION

HOW TO INSTALL

With regard to locating an installation position, it really comes down to the installer's imagination as to where to put it. Be extremely careful not to drill into fuel tanks, fuel lines, cabling, brake lines, etc. In some instances drilling into the chassis rail itself may not be optimal but apart from that there are at least 5 to 6 different options under every vehicle where you wish to install it.

  1. Identify your preferred bracket mounting position. Remember you want easy access.
  2. Push tube into chassis rails. Use the shorter tube without a red end.
  3. If a blockage occurs, twist the nylon tube and push it gently forward.
  4. Repeat the installation on the opposite chassis rail using the tube with a red end.
  5. Feed the other end of the longer tube through the crossrail to meet the other tube.
  6. Tie off the tubes in a secure position using the supplied cable ties
  7. If the tube kinks straighten it with pliers or it will stop the water flow.
  8. Use the supplied tube cutters to achieve a clean square cut.
  9. Push the tube into the grey fitting until it bottoms out.
  10. To remove or relocate push down on the grey ring fitting and pull the tube out.
  11. Fix the bracket to the vehicle using the supplied fittings.
  12. Connect the hose and turn the water on at the tap.
FLUSH YOUR CHASSIS
  1. Connect your garden hose to your Chassis ProTech fitting on the underside of your vehicle.
  2. For a standard flush, turn your tap on & let it run. Straight water is all it takes to wash sand, mud & salty water out of your rails after a trip.
  3. For ultimate rust prevention, take it a step above: run your Garden Hose Chemical Mixing Unit inline with 100ml of Salt Exterminator 4WD Wash, connected between your garden hose & your Chassis ProTech fitting. Turn the tap on your mixing unit on last, so you don't spray foam before it reaches your rails.
  4. The micro perforated line jets 360 degrees inside your rail, loosening built up clay, bull dust, sand & salt, then flushes it out of the chassis onto the ground. No lying on your back in the driveway.
  5. Flush until the water exiting your chassis holes runs clear (no foam).
★★★★★4.81422 verified reviews
✦ WHAT REVIEWERS SAY

Reviewers running boat trailers, work utes & tourers say it's the easiest way to keep the inside of the rails clean, no more crawling underneath. Set it up once, plug the hose in after each trip & let it flush itself out.

Summarised from verified Loox reviews of this product
★★★★★

Great product. Use it to do my boat trailer my work utes chasis and trailers.

Peter S.
★★★★★

So easy to get into all the tight little spots the mud hides in.

Stacey P.
READ ALL REVIEWS ON THE PRODUCT PAGE →

Chassis Flusher Wand Directions

View product →

DIRECTIONS

  1. Connect your Chassis Flusher Wand to your garden hose. For a proper chemical flush, run your Garden Hose Chemical Mixing Unit inline with 100ml of Salt Exterminator 4WD Wash.
  2. Feed the wand into your chassis rails through the factory holes & drain points.
  3. Now turn your tap on. If you're using the mixing unit, turn your garden tap on first & open the tap on the mixing unit last, so foam only starts once the wand is inside your rail.
  4. Work the 360° perforated end along each rail. It sprays every internal wall as it goes, loosening the salt, sand & mud a garden hose or gurney can't reach.
  5. Flush each section until the water exiting your chassis holes runs clear (no foam).
  6. Repeat through your cross rails, up under coil spring mounts & shock covers.
  7. Once your underbody is dry, we strongly recommend sealing your chassis with either Chassis Shield or Chassis Shield PRO before your next trip.
★★★★★4.81418 verified reviews
✦ WHAT REVIEWERS SAY

Reviewers say it gets water & foam into the rails, cross members & spots nothing else reaches, with the muck running straight out the drain holes. Cow muck, mud & beach sand all get called out as easy work. Cleanest chassis in the world, as one reviewer put it.

Summarised from verified Loox reviews of this product
★★★★★

Great at getting mud and cow muck off easily.

Louise O.
★★★★★

Cleanest chassis in the world.

Joe L.
★★★★★

Our caravan was covered in grime and dust. We did Outback tracks of Australia, Oodnadatta, Gibb River Road and Great Central.

Jock M.
READ ALL REVIEWS ON THE PRODUCT PAGE →

NEED A HAND? GIVE US A CALL!

Call one of our friendly experts on 1800 493 382
Calling hours 9am - 5pm Monday to Friday.

If you have any questions at all, whether it be for shipping, products, adapters or how to use anything on our store, please send us an email to help@4WDetail.com!

Or alternatively send us a message using the button on the bottom right of your screen. Looking forward to hearing from you!